You will Need: Styrofoam balls...you can find them in a bag in different sizes in the Dollar Tree or one size packs at Hobby Lobby. Of course the Dollar Tree has the right price and also the different sizes in one bag. I also found long "tubes" of styrofoam at Hobby Lobby to make the flat "candies" with. If you are making a wreath or garland or the candies will be where someone might try to eat one, you will need shrink wrap..(.you can find a shrink wrap for baskets at the Dollar Tree)... some strong string and you'll need a heat gun or hair dryer to shrink the wrap.
 |
you will need Mod Podge or white glue, paint, glitter or glitter paint OR instead of glitter or glitter paint, Twinkles (this is a clear "paint" with glitter in it), Twinkles makes it very easy, cuts out two steps (glue and then glitter) and gets my vote, ! I got the Twinkles in Walmart.The glitter is for the smaller balls.You will need dimensional paint in darker and lighter shades of the colors you are using for the larger balls and the flat candies, skewers (also Dollar Tree) something to stick the skewers into , I use a vintage glass frog or a block of styrofoam,
|
 |
| If you're making the flat "candies" with the tubes you will need a styrofoam cutter or a finely serrated knife to slice pieces about 1/4" thick . . |
 |
| Place the styrofoam on skewers and apply a thin coat of mod podge or white glue. Once that's dry paint in the color of your choice. You can use regular paint or enamel paint. For the flat pieces I just copied the design from a real candy. |
 |
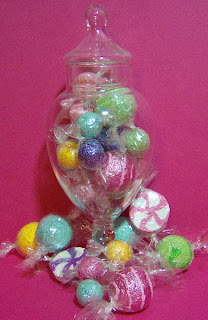
| If you are using glitter,once the paint is dry coat the smaller balls with mod podge or glue and roll in the glitter. If you are using the Twinkle then just apply a coat of that . I know the glitter doesn't show up in my photos but trust me they are sooo pretty and sparkly ! The small ones are done. The larger balls you will use the puff or dimensional paint on. If you have used a light color than use a darker shade in the dimensional paint and vice versa. Hold the skewer in one hand, squeeze the dimensional paint at the top and then rotating the skewer apply a thin band around the candy. Let them thoroughly dry. |
 |
| If you need to wrap your candies, cut pieces of shrink wrap so that they will overlap the candy by 1/2" and so that they are 2" over on each end. Twist the ends and tie with the string... I used some silver crochet thread. Fan out the ends then using a heat gun or a hair dryer on high, shrink the wrap to fit the candy. Snip the string short and trim the ends of the shrink wrap. This step will make it very difficult for anyone to unwrap the candy and try to eat it...BUT if you will have small children around make sure to tell them it is not real and keep it out of their reach. You might need to do this with some adults too...just sayin'. ( In my shop I had an adult pick up an artificial apple out of a display and take a big bite out of it.) This really is easy to do and you can get just the colors you want. When I was looking all I could find was red and green and you know I wanted PINK and PURPLE and turquoise!! ....if you have any questions I will be more than happy to answer them. (()) | | | |
|


11 comments
Carol
I'm still going to look for some of that Twinkle at the store.
These do look like real candies. I'm going to show this to my mom, too. She loves whimsical things, especially at Christmas. What a great way to make "sugar plums dancing in their heads"!
big hugs Beth
This really looks like a good project - your little candy pieces look good enough to eat - do they come with a warning?
Smiles,
Kim
Thanks